fredag, juni 21, 2013

Partytime!

Pretty flowers are a must when it comes to party decorating for young ladies like Princess...
...and Princess wanted a yellow theme, but not as in "Easter decor"
All ready to go!
And this is how it all came together - creating a fresh but romantic and youthful athmosphere for Princess civil confirmation party
Princess enjoyed her big day and seemed quite happy with the company and attention from all her family and relatives after all :o)

søndag, juni 16, 2013

Better late than never... another Ripple!

The finished blanket measures 97 x 152 cm which is sufficient for a nap on the sofa ;o) I think it was actually done before the end of April, I just never got around to take any photos after weaving in the ends and washing it. I love the effect of the different yarns that range from plain cotton to pure silk. I have used scraps of sturdy wool and soft, featherlight angora as well as some cheap acrylic of unknown origins. The subtle tones of white, off white and beige makes this a true eye candy. Modest and clean and pretty!


lørdag, juni 08, 2013

Potager - Part four

Finally, the last chapter of this pallet frame potager tutorial. Previous posts contain parts one, two and three of the tutorial/documentary...
A four-legged furry friend watches closely - maybe this is what the dog is thinking: "what is that crazy lady up to today...? Digging for hours (thought that was MY job), then replacing the turf with soil that will be OUT OF MY REACH...??? Peculiar and stubborn is what I would call her...you know, they say that the dog resembles the owner and vice versa..."
I thoroughly watered the potager modules making sure the moist reached all the way down through the soil. this took quite a while and is of course best to do in the afternoon or early morning as direct sunlight will make the water evaporate.
The pre-cultivated (and in some cases not by me) plants are now where they should be - and a few mm below the surface of the soil there are lines of tiny seeds waiting to sprout.
As usual I plant and sow quite densely with the firm intention to thin the sprouts later on, but never get around to do just that - but I highly recommend thinning your plants to make sure they get enough air and light. THIS year I will do the right thing, I promise...
...because the jungel-like look of the potagers when we reached mid summer was not exactely pretty, and the crop was more or less spoiled. "Don t do as I do, do as I tell you to do" - and good luck with that ;o)

fredag, juni 07, 2013

Potager - Part three

If you want the whole story, check out the pallet frame potager tutorial parts one and two
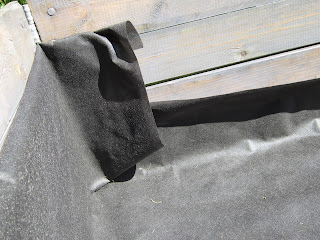
I used a double layer of bark cloth to line the pallet frames, shown step by step below. This is done to delay the inevitable weed growing up from the deeper layers of soil for as long as possible. It is important to use a breathing material for this and by all means avoid plastic as this will caus lack of drainage which in turn will make the plants drown and rot...

I used a few cardboard nails (short nails with large, flat heads) to secure the bark cloth before adding a 10 cm layer of cow dung fertilizer (don t worry - your potager will NOT smell bad at all, even though you will experience quite a stench as you work with this shit (pun intended...) :o)
Finally I added regular weeded plant soil, making sure the soil surface is at least 10 cm below the top of the pallet frame to make room for watering the potager, as seen below.
 
As the ground is not level in our garden, I tried to make the surface of the soil level, to enable an even distribution of water. This will prevent the water from gathering in a corner or in one end of the potager.
 
Done! But still some vital parts missing - yes, I am talking about the PLANTS. To be continued...

onsdag, juni 05, 2013

Potager - Part two

 
Have a look at Potager - Part one if you want the full tutorial for making a potager using pallet frames
...let the hard work begin... Using a flat spade I cut smallish squares of turf and lifted it with a bigger and lighter shovel. I used two of the pallet frames to outline the areas for the potager modules, by pressing them firmly into the grass. This left quite sharp guidelines for the digging.
After removing the turf from both potager modules I thoroughly weeded the top 10 cm of soil by removing small roots etc. Below: Some are not ashamed to watch others do the hard work... 

One layer of pallet frames...
...and then another on top.
A knothole needed to be sealed and a piece of one of the bigger roots I dug up came handy.
Rady for the next step - lining and filling the pallet frames. To be continued...

tirsdag, juni 04, 2013

Potager - Part one

Last spring I decided to finally have a go at making a potager in our garden, using pallet frames. The photo above shows the frames before the staining.
To prepare the pallet frames for their new duties, they got two coats of oil based stain for outdoor use. Partly to make them last longer, partly to make them look better and more uniform.
 
Two of the frames werw old and worn and already had a nice patinated look even before my first coat of stain.
 

The difference between the "worn" and the "new" frames are less obvious after the two coats of stain, as seen above and under
 
Voila! All done and ready to serve as potager modules, as shown under.
To be continued...