mandag, september 30, 2013

Tweeny loop

Det er fortsatt ganske så fint vær på mine kanter, men temperaturen begynner å synke. Ull fra topp til tå er snart påkrevd - iallfall om morgenen. Jeg har funnet ut at skjef i form av en loop igrunn passer meg veldig godt - de er enkle å dandere fint, og varmer godt oppunder haka :o) Nå har jeg startet på en slik loop innimellom de andre prosjektene mine - derav tittelen...
The weather is still quite nice around here but the temperature is dropping. Wool garments from top to toe will soon be required, at least in the morning. I find the loop a better alternative to the traditionel scarf as it is easy to arrange attractively around the neck, and it is great for warming the chin and cheeks if necessary too :o) I just startet a loop in between my other projects (thereby the title of this post...)
 
Jeg strikker 8 p struktur og 4 p glattstrikk i to farger, og hekler fortløpende picoter langs den ene sida, i stedet for å bare trekke med tråden ved fargeskift. Dette ser ut til å bli ganske bra - flere detaljer og oppskrift kommer når loopen er ferdig. Her en forklaring på hvordan jeg hekler picotkanten fortløpende:
 
The pattern is very simple; 8 rows of a structure pattern and 4 rows of stockinette. I make chrochet picots as I go, insted of simply pulling the strand along as I change colour. So far this edging looks fine. More details and a pattern as soon as the loop is finished. As for now an explanation for how to make the picot edge as you go:


Hold trådene over pekefingeren // Keep both strands over index finger
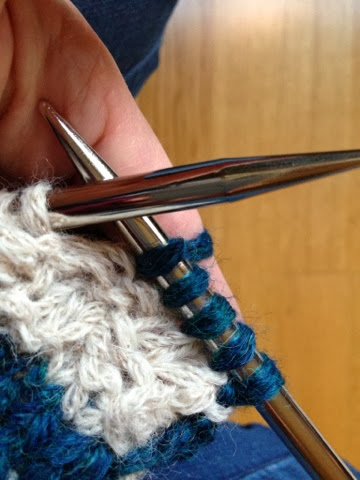
Bruk heklenål i passe str. og før den gjennom endemasken på forrige farge // Use crochet hook of desired size and insert through end stitch of previous row
Lag tre luftmasker med forrige farge // Make three chain st with previous colour
Lag picot ved å hekle en fastmaske i første luftmaske // Make picot by making a double crochet (UK) / single crochet (US) in the 1st chain st
 
Løft masken fra heklenåla over på strikkepinnen // Lift the stitch from the crochet hook onto knitting needle
Fortsett å strikke, men strikk første maske gjennom begge fargene/maskene først på pinnen som vist // Keep knitting as you knit the first stitcg through both colours/stitches as shown
 
...strikk videre og gjenta ved neste fargeskift. På den bredeste stripa lages en picot, festes i kanten med en kjedemaske før det lages en picot til, som løftes inn på pinnen som vist  forklaringen over // ...knit on and repeat at next colour change. The wider stripe requires two picots: Crochet one picot, make a slip st to secure to edge and make the next picot and lift stitch onto knitting needle as described above.

søndag, september 29, 2013

Resumé

Til tross for minimal bloggaktivitet noen måneder har det altså vært en viss produktivitet. Et av de større prosjektene jeg fullførte i vår, var det "hvite" siksakteppet, også omtalt i et tidligere innlegg. Dette teppet har blitt en favoritt, med alle de forskjellige hvitaktige nyansene og ulike teksturene. For en gangs skyld kjøpte jeg ikke en meter med nytt garn for å fylle på alle restene mine - det fikk bli så stort som garnet ville. Her er det alt fra angoragarn til grov ull og grusomt akrylgarn - men som helhet er teppet nydelig, synes jeg.


Så var jeg som vanlig klar for neste teppe før jeg var ferdig med det forrige, og la med stor iver opp på nok et siksakteppe. Denne gangen i grønne og blå nyanser, det aller meste rester (men litt påfyll fra tilbudskurver tillot jeg meg å kjøpe denne gangen, for å få materialmengden til å "gå opp".) Nå er det vel ca 15 % igjen å hekle på dette teppet, som er en drøy meter bredt og skal etter planen bli 2 m langt - men det vil jo restene bestemme...


Despite the minimal activity on the blog the latest few months there has been a certain fibre related productivity. This spring I finished a ripple blanket, also posted in a previous entry. I just love this blanket, with all the different white and neutral hues. For once I did not buy as much as a yard of new yarn for this scrap project - the size was decided by the amount of scraps available. It consists of a variety of yarns from the softest angora to the roughest wool and detestful acrylic - but all the qualities and hues comes together beautifully in my opinion.

Then, as usual, I was ready to start the next big ripple before I had even completed the last one. This time I gathered all my blue and green scraps, and allowed myself to buy a few balls from a discount basket, to make sure I can get close to the desired size. The blanket is a good metre wide and I think that 85 % of the work is done at the moment. I hope the blanket will be long enough to serve as a bed cover, so the goal is two metres but the scraps will now decide the final measurements...

torsdag, september 26, 2013

Viva Las Vegas..?

Dette er et rett og slett et dumdristig prosjekt - men jeg har foreløpig god tro på suksess :o) I sommer kom Drops med et nytt garn, i mange herlige farger.  100 % merino - deilig og mykt...

This project is a risky one - I would go as far as calling it a gamble... So far it looks promising and I actually believe in my future success. This sommer Drops launched a brand new yarn in several beautiful colours. 100 % merino; wonderfully soft and light...

Samtidig hadde jeg nettopp kjøpt denne nydelige boka, med massevis av plagg i "min" fasong. 

Simultaniously I purchased this excellent book; a collection of greatly designed garments with silhouettes perfect for my bodyshape.

Så selv om jeg hadde veldig lyst på det nye garnet i omtrent alle fargene, var jeg "flink" og holdt meg til opprinnelig plan: finne garn til denne jakka:

Despite my urge to buy all the colours I managed to control myself and stick to the original plan: find suitable yarn for this long jacket:

Jeg kjøpte 750 g og er spent på om dette blir nok - men det tror jeg faktisk det blir. Så hva er da det dumdristige med dette? Jo, det er jo dette med at vi snakker om en helt ny garnsort, som dermed ikke er testa og godkjent av verken meg eller andre strikkere jeg stoler på ;o) I min strikkehistorie finnes opp til flere egendesignede plagg som rett og slett ikke er fine i bruk, pga at garnet jeg valgte ikke egna seg. 

I ended up with 750 g of off white, not knowing if this will be enough for this large garment, but at the moment I think it will. So exactely where is the gambling aspect of this project, you may ask? Well, the fact that this is a brand new yarn, N O T tested and tried by me or other reliable knitters worries me quite a bit. The darker parts of my knitting biography holds a few tales about garments designed nd knitted by me - the design being good (on a good day I would even say great). Some of them are simply not wearable because of a well intended but bad choice of yarn...

Så det h a d d e vært smart å prøve ut garnet i et litt mindre omfattende prosjekt først, kanskje...? Vel, vel, nå gjenstår max 25 % av arbeidet på denne jakka, så vi får snart svar! HVIS jakka holder seg pen gjennom 5-6 gangers bruk + en vask, vil jeg si at garnet er godkjent - og HVIS jeg godkjenner det, er jeg å finne i garnbutikken for å kjøpe mer, i de andre fargene, før du kan si STRIKK! 

...so it probably would have been smarter to make a smaller test-project before embarking on this one...? With 75 % of the knitting done we will soon get the answer! IF the jacket keeps its shape and texture through wear, tear and a wash or two, I would give it my "approved" stamp and be back at my LYS to get more - in other colours - before you can say KNIT!

onsdag, september 25, 2013

Testing testing One Two

I am still waiting for a new "spring"... AKA inspiration to keep blogging. I have no idle hands; knitting and crocheting as usual, and even planning some makeovers for several rooms in the house. Today I am just testing the mobile blog app - hoping this will give me a nudge in the right blogging direction ;-)


Joda, jeg holder på - både med strikking, hekling og planer for diverse oppussingsprosjekter i heimen. Så det er ikke fordi jeg ikke har noe å blogge om jeg ikke blogger - tvert i mot ;-) I dag ville jeg bare teste blogg-appen min i håp om at denne nyvinningen kan gi meg en dytt i riktig bloggretning :-)

torsdag, august 08, 2013

Alive and kicking..?

The weeks of summer came and went - and RL had my full attention. August is upon us - being the last "summer month" according to Norwegion common knowledge. I hope there are still days of good temperature and sunshine to come - and as a tribute to this wish I decided to experiment a bit on this blog. Starting by posting a photo from my old mobile phone. I have a lot of creative plans and projects on the go, so hopefully the blog will be revived and alive - yet again :-)

fredag, juni 21, 2013

Partytime!

Pretty flowers are a must when it comes to party decorating for young ladies like Princess...
...and Princess wanted a yellow theme, but not as in "Easter decor"
All ready to go!
And this is how it all came together - creating a fresh but romantic and youthful athmosphere for Princess civil confirmation party
Princess enjoyed her big day and seemed quite happy with the company and attention from all her family and relatives after all :o)

søndag, juni 16, 2013

Better late than never... another Ripple!

The finished blanket measures 97 x 152 cm which is sufficient for a nap on the sofa ;o) I think it was actually done before the end of April, I just never got around to take any photos after weaving in the ends and washing it. I love the effect of the different yarns that range from plain cotton to pure silk. I have used scraps of sturdy wool and soft, featherlight angora as well as some cheap acrylic of unknown origins. The subtle tones of white, off white and beige makes this a true eye candy. Modest and clean and pretty!


lørdag, juni 08, 2013

Potager - Part four

Finally, the last chapter of this pallet frame potager tutorial. Previous posts contain parts one, two and three of the tutorial/documentary...
A four-legged furry friend watches closely - maybe this is what the dog is thinking: "what is that crazy lady up to today...? Digging for hours (thought that was MY job), then replacing the turf with soil that will be OUT OF MY REACH...??? Peculiar and stubborn is what I would call her...you know, they say that the dog resembles the owner and vice versa..."
I thoroughly watered the potager modules making sure the moist reached all the way down through the soil. this took quite a while and is of course best to do in the afternoon or early morning as direct sunlight will make the water evaporate.
The pre-cultivated (and in some cases not by me) plants are now where they should be - and a few mm below the surface of the soil there are lines of tiny seeds waiting to sprout.
As usual I plant and sow quite densely with the firm intention to thin the sprouts later on, but never get around to do just that - but I highly recommend thinning your plants to make sure they get enough air and light. THIS year I will do the right thing, I promise...
...because the jungel-like look of the potagers when we reached mid summer was not exactely pretty, and the crop was more or less spoiled. "Don t do as I do, do as I tell you to do" - and good luck with that ;o)

fredag, juni 07, 2013

Potager - Part three

If you want the whole story, check out the pallet frame potager tutorial parts one and two
I used a double layer of bark cloth to line the pallet frames, shown step by step below. This is done to delay the inevitable weed growing up from the deeper layers of soil for as long as possible. It is important to use a breathing material for this and by all means avoid plastic as this will caus lack of drainage which in turn will make the plants drown and rot...

I used a few cardboard nails (short nails with large, flat heads) to secure the bark cloth before adding a 10 cm layer of cow dung fertilizer (don t worry - your potager will NOT smell bad at all, even though you will experience quite a stench as you work with this shit (pun intended...) :o)
Finally I added regular weeded plant soil, making sure the soil surface is at least 10 cm below the top of the pallet frame to make room for watering the potager, as seen below.
 
As the ground is not level in our garden, I tried to make the surface of the soil level, to enable an even distribution of water. This will prevent the water from gathering in a corner or in one end of the potager.
 
Done! But still some vital parts missing - yes, I am talking about the PLANTS. To be continued...

onsdag, juni 05, 2013

Potager - Part two

 
Have a look at Potager - Part one if you want the full tutorial for making a potager using pallet frames
...let the hard work begin... Using a flat spade I cut smallish squares of turf and lifted it with a bigger and lighter shovel. I used two of the pallet frames to outline the areas for the potager modules, by pressing them firmly into the grass. This left quite sharp guidelines for the digging.
After removing the turf from both potager modules I thoroughly weeded the top 10 cm of soil by removing small roots etc. Below: Some are not ashamed to watch others do the hard work... 

One layer of pallet frames...
...and then another on top.
A knothole needed to be sealed and a piece of one of the bigger roots I dug up came handy.
Rady for the next step - lining and filling the pallet frames. To be continued...

tirsdag, juni 04, 2013

Potager - Part one

Last spring I decided to finally have a go at making a potager in our garden, using pallet frames. The photo above shows the frames before the staining.
To prepare the pallet frames for their new duties, they got two coats of oil based stain for outdoor use. Partly to make them last longer, partly to make them look better and more uniform.
 
Two of the frames werw old and worn and already had a nice patinated look even before my first coat of stain.
 

The difference between the "worn" and the "new" frames are less obvious after the two coats of stain, as seen above and under
 
Voila! All done and ready to serve as potager modules, as shown under.
To be continued...